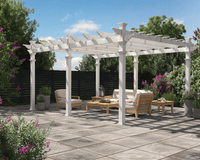
With the nicer weather here, I know many of you will be happy to be outside enjoying everything the warm weather brings. One of the great things you can enjoy this summer is one of the many Pergola options Vita offers.
I am here to explain part of the installation methods for installing the vinyl pergolas we offer here at Vita.
In my previous blog, I showed how you install our bolt down brackets when installing a pergola on a concrete pad or wood/composite deck
These are designed to hold the pressure treated posts that go inside the Pergola Vinyl Posts. The bolt down brackets will fit a pressure treated 4” x 4” wood post, and because most of the pergolas Vita offers come with 5” x 5” vinyl post sleeves you will be required to add shims to the wood post to fill the gap between the wood post and the vinyl post sleeve.
In this blog I am providing you with a step-by-step guide for installing wood shims to the wood support post. A standard 4” x 4” pressure treated posts measures 3 ½”x 3 1/1” square.
Most Vita pergolas come with 5” x 5” vinyl posts sleeves. If a customer is installing the pergola on a concrete pad or deck, they will require bolt down brackets that accommodate the 4” x 4” pressure treated post. Wood shims measuring ½” are required to be added to the 4” x 4” pressure treated post to fill the gap between the pressure treated post and the 5” x 5” vinyl post sleeve.
⦁ 1/2 “shims which can be cut out of a sheet of ½” plywood.
⦁ Cut 2 pcs of ½” plywood 3 ½” wide by 12” long.


⦁ Cut 2 pcs of ½” plywood 4 ½” wide by 12” long. These pcs are cut wider to cover the gap left by adding the 3 ½” pcs to the post.
⦁ Following the pergola instructions, there will be 2 sets of shims per post. The first set will be attached to the post at top of the bolt down bracket, 6” from the base of the bolt down bracket. The second set of shims will be attached to the post 60” from the base of the bolt down bracket to the bottom of the wood shim (72” from the base of the bolt down bracket to the top of the shim).
⦁ Attach the wood shims to the pressure treated post using 1” nails or wood screws.
⦁ Nail the 3 ½” wood shims on either side of the post. This will increase the width of the post to 4 ½”.
⦁ Attached the 2 pcs of 4 ½” wood shims to the other side of the post. This will give a complete 4 ½ shim coverage around the post.
⦁ The vinyl post sleeve will fit over the post and shims, allowing for the installation of 5” x 5” vinyl post sleeve.
If you follow these steps, you will be able to install the shims, add the vinyl posts and have the base set up for you beautiful new Vita pergola.
Hope this helps and have a wonderful summer!
Clair