Tip 1: Matchmaking
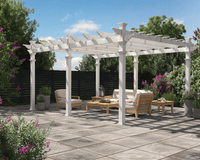
Here at Vita we strive to be adaptable! We have designed three specific shade styles to meet our customers unique needs. Our main style is a classic flat top pergola that utilizes both rafters and shade slats to provide a comfortable getaway in your space. The second is our shade weave style that uses a beautiful poly-canvas to block direct sun and filter light for a convenient and lightweight retreat. The final option is our louvered shade system. This system uses a series of louver boards that follow a track system you can adjust to your liking. Each louver assembly can be adjusted, allowing for one side of the pergola to be in complete shade while the other can be soaking up the sun!
Tip 2: Find Your Footing
When planning your pergola, the key to having a successful install is ensuring you know which mode of securement you will be using. The most common method of installment is in-ground. This mode requires that you submerge the interior wooden 4x4 posts directly into the ground using a concrete footing. If you are planning to install your pergola onto a deck or concrete slab patio, you will require our Bolt Down Bracket System. This system utilizes galvanized steel brackets that will keep your pergola strong and secure!
Tip 3: What Goes Up?
Our pergolas use a premium vinyl or composite to encase pressure treated wood to ensure longevity. To know which additional materials you will need, please visit the instructions listed on each of our pergola’s pages. The majority of our pergolas will use a variety of pressure treated 4x4”s as well as 2x6”s. If your pergola is an attached model, you will also need to consider the material you are attaching it to, and the hardware you will need to purchase for it accordingly.
Tip 4: Square it Up!
Ensuring you have a square footprint for your pergola is essential to its assembly. Our instructions list multiple ways to achieve this with measurements used in accordance to installation type and product model (i.e. in-ground or surface mount). Our models range from 6.5 x 6.5’ to 12 x2 4’, so knowing the area you have to work with will allow for a plumb and proper pergola!
Tip 5: Headspace
While the mounting of the pergola is extremely crucial for proper installation, accounting for the height of your space is equally as important. Some of our pergolas can mount onto your lovely home but do note any potential obstructions such as windows or doors. We have developed a safe and secure Pergola Extension Kit to account for these obstacles which allows you to extend the height of your pergola by a maximum of 24”. They also come with a decorative base molding which will cover the joint between the column and added extension for a seamless look.
Tip 6: Time Management
When embarking on the journey of installing a pergola, take time to think over what the best option is for you. Are you a certified contractor or carpenter, a DIY weekend warrior, or not too keen on using tools more powerful than an electric toothbrush? All of these are okay! You may just need to adjust your time allotment and the level of assistance required. When you find a model you are interested in, check its details page for estimated installation time. This will help you plan your install and book contractors if required.
Tip 7: Check, Check, Triple Check
Our pergolas ship across Canada from our warehouse in Ontario. They can often embark on long journeys to get to your home and sometimes look a little tired from the trip. If you notice any damage on the boxes, please go ahead and proceed with the required pre-installation inventory. If anything is missing or less than perfect let us know right away so we can remedy the issue! Our contact number is 1-800-282-9346 (8am-5pm ET)
Tip 8: Toolbox
While checking to ensure all your pergola’s components had a safe journey to your location, we also recommend noting all the tools you will need for an easy installation. Having the proper tools will allow you to go into the build with confidence and knowledge of what to expect when assembling. Many of our models will require: power drills, ladders, tape measures, levels, hammers and string lines!
Ready?
Taking all these points into consideration, will allow you to have a solid foundation of knowledge to assist you with an efficient and easy installation. If you are curious about the nitty gritty of assembly, you should look into the pergola section of our FAQ’s.
If you have any quick questions, you can contact us using our chat widget on our website or by email help@wearevita.com. Or simply give us a call on our toll free number 1-(800) 282-9346. We are happy to assist you.
Here at Vita we want our customers to be the most informed and prepared for their exciting additions. Following these tips, FAQs, and most importantly the instructions (please use the instructions!), will ensure you have the information required to have your pergola up in no time!